|
|
Post by darklord1967 on Aug 6, 2008 9:57:31 GMT -5
Hi Gang!
Roberto "Darklord" Williams here. Major Batman fan. This looks like a great place to hang out and make friends, so I've pulled up a chair.
Feel free to say hello and introduce yourselves.
I'm a long time toy customizer and illustrator, so naturally a lot of my work relates to the Dark Knight himself.
I hope you enjoy my stuff...
|
|
|
|
Post by darklord1967 on Aug 6, 2008 10:06:27 GMT -5
This is an un-finished pencil drawing I’ve been working on of The (classic) Dynamic Duo. It’s titled “Gotham Night Patrol”. MEDIA: Mixed-hardness pencils on 1/4 inch thick white painted masonite hardboard. MEASURE: 4 feet wide by 6 feet tall. SYNOPSIS: This is a night time scene depicting the Dynamic Duo on vigilant patrol from a grimy rooftop in Gotham City. The scream of a crime victim has just risen from far below, and the pair prepare to leap into action. A pale full moon lights the scene, and the hazy smoke from a nearby roof top’s chimney hangs behind our heroes. Hope you guys like it.  |
|
|
|
Post by darklord1967 on Aug 6, 2008 10:14:31 GMT -5
33 years ago, on Christmas morning, a fledging Action figure customizer was born! That was the morning when I, as an 8 year old little boy, found myself terribly disappointed with my brand new Batman and Robin Mego "dolls", the off-scale Batmobile, and the carboard Batcave Playset toys! I was grateful to have these toys, and I enjoyed playing with them of course. But I just couldn't ignore the goofy designs and lack of detail.  Charming, cute, and more than just a little bit silly looking... especially by today's standards. Therein lies the problem. Everyone knows that in the twisted, dangerous, garish world of Gothm City that "cute" is way out of place! 30 years later, I took matters into my own hands... |
|
|
|
Post by darklord1967 on Aug 6, 2008 10:15:28 GMT -5
I found substantial room for improvement over Mego's original 8 Inch action figure version of THE JOKER... First off, I eliminated the silk-screened leotard that Mego provided and fashioned all-new SEPARATE garments (custom silk green shirt, flaming orange flannel vest, baggy "pleated" purple pants with fat black pinstripes and tall waistband. As for his zany purple blazer, I only added a wild orange satin lining to the tails to spruce them up. At this point, I added the decorative details to the figure like buttons, floppy black tie, bright red lapel flower, a pair of purple dress sox and, a pair of white spats draped over his standard brown Mego shoes. He also wears a dandy pair of CLOTH white dress gloves, which unfortunately did not photograph as well as I’d hoped. The recent update of this figure is the all-new terrifying head sculpt that I commissioned from Ada Chan (based on upcoming Joker bust)). I created a custom Mego-styled window box on computer for THE JOKER to sleep in and called him finished! Custom Action Figure and photo by Roberto Williams   |
|
|
|
Post by darklord1967 on Aug 6, 2008 10:16:33 GMT -5
A Custom MEGO Bat-Project would NOT be complete without THE RIDDLERI've always had a preference for the prince of puzzlers' classic unitard outfit, so that's the version of the characrter that I've created (just as MEGO originally did). This customization is still in progress, so some of the details in the photo below are created via photoshop (Re:purple gauntlets). The plan here is to provide much tighter, snugger fitting lycra-spandex tights with vinyl question mark transfers all over his uniform (already provided by my buddy Charlee Flatt). The Riddler features a brand-new custom Edward Nigma head sculpt (commissioned from Ada Chan), a removable face mask, custom purple velvet gauntlets and a new larger waist band belt. His custom-designed MEGO-styled window box has already been created. Custom Action Figure and photo by Roberto Williams.   |
|
|
|
Post by darklord1967 on Aug 6, 2008 10:17:39 GMT -5
Sorry, no photos yet of the custom MEGO Action Figures of the two costumed LADIES in The Batman's life. They are both getting their finishing touches on my work bench. But here is the custom packaging I designed for Batgirl and the Catwoman  |
|
|
|
Post by darklord1967 on Aug 6, 2008 10:18:33 GMT -5
There are currently plans on my work bench for a "World's Greatest Secret Identities" line of custom MEGO action figures: Bruce Wayne , (young) Richard Grayson, and Alfred Pennyworth and Barbara Gordon. For now, these are the custom boxes I designed...     |
|
|
|
Post by darklord1967 on Aug 6, 2008 10:19:32 GMT -5
“Rounding out” this rouge's gallery of Bat-villains is my customized action figure rendition of the nefarious Oswald Cobblepot! MEGO'S original action figure version of THE PENGUIN required a complete and total make-over. This figure has customized shorter and thicker legs to give him a 7 inch tall body height (to actually make him SHORTER than the other 8 inch tall characters). He has an all-new (more sinister) head sculpt with a removable top hat and monocle with lens (not molded onto the head sculpt like MEGO's original.) THE PENGUIN now wears brand new custom-made SEPARATE clothing garments: white shirt, silk bow-tie, silk orange cumberbundt, purple dress pants, sox, white spats on top of wing-tip shoes, buttons (unlike MEGO's original silk-screen printed leotard). My customized PENGUIN action figure also wears white silk dress gloves with cuffs (instead of MEGO's simple "white hands"), and he has custom-made cigarette-holder and umbrella accessories (which MEGO never included with their original action figure!) I also created a customized MEGO-styled window-box package for this action figure on computer in Adobe Photoshop. Custom Action Figure and photo by Roberto Williams   |
|
|
|
Post by darklord1967 on Aug 6, 2008 10:20:38 GMT -5
Next up is my custom MEGO 8 inch action figure of Gotham City’s POLICE COMMISSIONER GORDON! The Commissioner is pictured here during a particularly dangerous night in Gotham City as he summons the Caped Crusaders with the famed Bat-Signal (toy prop created by DC Direct Products)! This custom COMMISSIONER GORDON action figure was a lot of fun, but very difficult to create. I developed his head sculpt from an existing MEGO sculpt which I re-worked and repainted extensively with a large mustache added. I also went through a VERY difficult time creating those tiny eye glasses (with lenses included!) and incorporating them seamlessly into Gordons hairline. Legendary MEGO customizer Charlee Flatt helped me out by providing Gordon's custom-made basic black business suit, a white shirt, a pair of black sox, and a tan rain-overcoat. I made a belt for his trousers easily enough, but I had a REALLY difficult time creating that silk neck-tie of his that I had to knot (windsor-style) with tweezers! Custom-made accessories for this figure (not pictured) include a GCPD badge, a service revolver, and a smoking pipe. He also sleeps in a custom-made MEGO-styled window box package that I created for him on computer in Adobe Photoshop. Custom Action Figure and photo by Roberto Williams   |
|
|
|
Post by darklord1967 on Aug 6, 2008 10:21:45 GMT -5
It was "TOTAL MAKE-OVER TIME" for these two guys! There was just NO WAY around it!! My goal was to create a "Classic Dynamic Duo" that reflected the darker tone of the comics, and accurately displayed the PHYSICAL DIFFERENCE between man and BOY wonder. To accomplish this goal I used the (shorter) 6 inch "boy" action figure body from MEGO's 1976 "OUR GANG" collection as the basis to create ROBIN The Boy Wonder. "Alfalfa" was used (for the main body) as was "Mickey" (for the head sculpt). I re-sculpted the Mickey head with a new Richard Grayson" hair style, and a boyish smirk, and then made a 5% smaller final casting with these new sculpted changes. With the exception of the green shorts and t-shirt sleeves (which were both borrowed and tailored from Mego’s original Robin action figure), ALL of the costume items had to be created from scratch. The biggest challenge was fashioning Robin’s gauntlets (bye-bye vinyl oven mitts!!! ) and "pixie" boots out of lime green fabric. Holy fashion statement!!!! THE BATMAN began life as a standard nude MEGO 8 inch "type II" (muscular) body. I replaced the original MEGO arms with the bulkier upper arms found on LJN’s 8 inch SWAT action figure from the ‘1970’s. These new arms also have a "swivel" joint in the biceps which allow for much more posing. I selected an existing MEGO head sculpt to double as "Bruce Wayne" , and with a quick hair re-sculpt and re-paint, he was done. The creation of The Batman’s costume was a challange: He needed some tighter-fitting dark grey lycra spandex tights that improved upon Mego’s original "pajama-fit" costume. Here, Charlee Flatt came to my rescue by providing the excellent sewing chores. I created everything else. I attempted to make The Batman’s removable mask using Pez Candy Dispensers that I radically re-sculpted. After no less than 15 failed attempts (!!!), I finally got one to fit on the action figure’s head!! The mask pictured in this photo is the FINAL one that I created. Accessories for both of these action figures (not pictured) include Bat-ropes, and two different folding "Bat-a-Rangs" BOTH action figures sleep in MEGO-styled window-box packaging that I created for them on computer in Adobe Photoshop. Custom Action Figures and photo by Roberto Williams    |
|
|
|
Post by darklord1967 on Aug 6, 2008 10:24:49 GMT -5
Earlier on, I mentioned my upcoming “Wayne Manor Collection” of custom Secret Identity figures (Bruce, Dick, Alfred, abd Barbara). Well what’s a Wayne Manor collection without… well… Wayne Manor? I’ve just taken delivery of this dollhouse (as a kit), and it will become the official Wayne Manor to my custom MEGO Playboy, ward, and manservant. This 14 room (!) mansion dollhouse is made entirely of milled plywood, and features an opening front face, and a full grand staircase. Now folks, I do not exaggerate when I tell you this dollhouse is HUGE!!! Finished, it measures 36" tall, 24-3/4 inches deep, and an incredible 69-1/8 inches wide (that’s over 5 1/2 feet!) I’ve spent the last 5 years collecting up many of the peripheral items that I’ll be using with this Wayne Manor dollhouse playset (Re: Miniature trees, green velvet matt for the sprawling lawn, etc.)  |
|
|
|
Post by darklord1967 on Aug 6, 2008 10:28:58 GMT -5
And now, a glimpse into the 1966 BAtmobile I am scratch building for my custom MEGO Dynamic Duo...
|
|
|
|
Post by darklord1967 on Aug 6, 2008 10:30:01 GMT -5
This customizing story actually begins way back on Christmas morning of 1975. There I was, 7 years old, opening up the MEGO Batman toys that my parents gave me as gifts. I was already less than thrilled with the lack of detail and the silly giant oven mitts worn by the Batman and Robin figures. But as a little boy obssessed with The Batmobile, my biggest disappointment was actually yet to come. 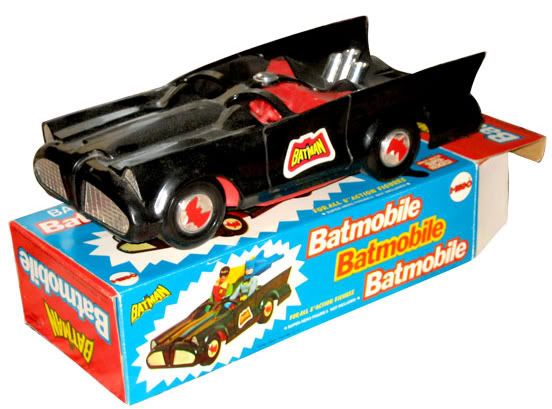 I remember that I took the MEGO Batmobile out of its package and I actually frowned. Yup… even as a 7 year old. An obsessive little voice in my head screamed, “Where are the bubble windows? Why are the wheels all wrong? Why is there no red pinstriping on the car? Why is the emblem on the doors all wrong? Why is the interior entirely in red? Why is there no jet afterburner tube in the back? Where are the parachute packs?”, and probably most nagging of all “Why is it so darn SMALL???” At a mere 13 inches in length, this Batmobile looked more like a Bat-Go Kart with MEGO figures sitting in it!! In short, I was NOT happy. But I was going to have to wait 26 years before I could do anything about it… |
|
|
|
Post by darklord1967 on Aug 6, 2008 10:30:55 GMT -5
Fast forward to spring of 2001. I was putting the final touches on the initial series of 8 inch scale customized MEGO Bat-Characters that I had created. It occurred to me that the time was right to begin preliminary work on a customized ride for my custom Dynamic Duo. I purchased a MEGO Batmobile from E-bay in pretty good condition (to replace my long-lost specimen from ’75), and I began my plans to customize it with all the details I wanted to see. 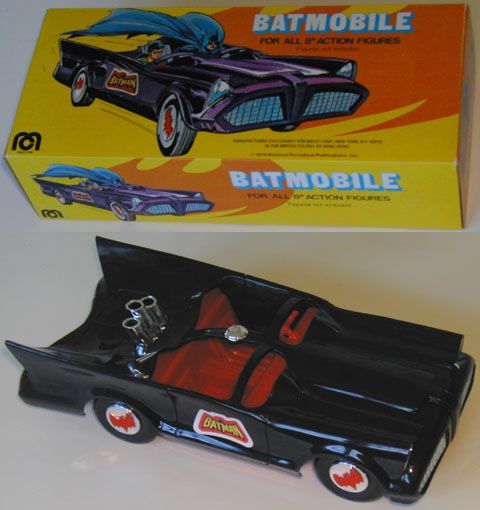 Unfortunately, NONE of my plans could ever correct the biggest issue I had with the toy… its lack of correct size. And I just couldn’t bear to STUFF my new custom MEGO Batman and Robin action figures into this tiny under-scaled Go-Kart. 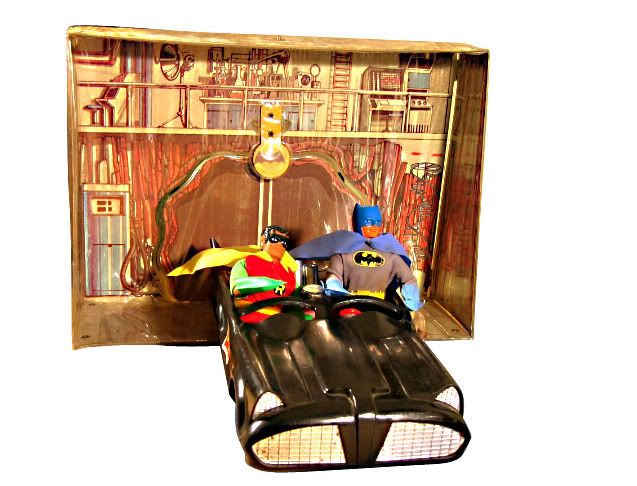 NO, it became pretty clear to me that building an entire car from scratch was going to be the order of businesss. |
|
|
|
Post by darklord1967 on Aug 6, 2008 10:32:04 GMT -5
I began doing extensive research, and read everything I could find about George Barris’ creation of the famous crime-fighting car. The wealth of information I found was fascinating: The Batmobile was based off of a 1955 experimental concept car that Barris owned called the Lincoln “Futura”. The car had been featured in the film "It Started With A Kiss", starring Glen Ford and Debbie Reynolds. 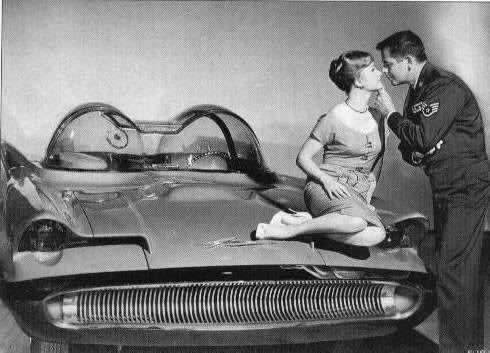 When production was over, the studio sold the car to Barris for $1 (rather than pay exhorbitant storage fees). By the time the Producers of "BATMAN" approached Barris about designing and building a slick, modern Batmobile for their upcoming show, the old car had been sitting rusting in the back lot of Barris' Hollywood custom "chop shop" shop for years. 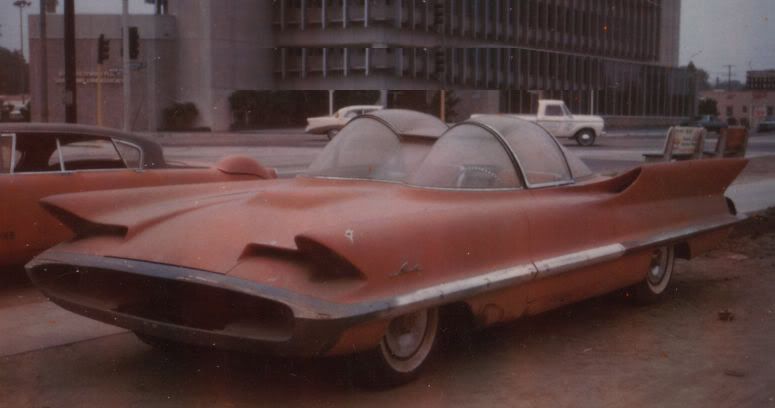 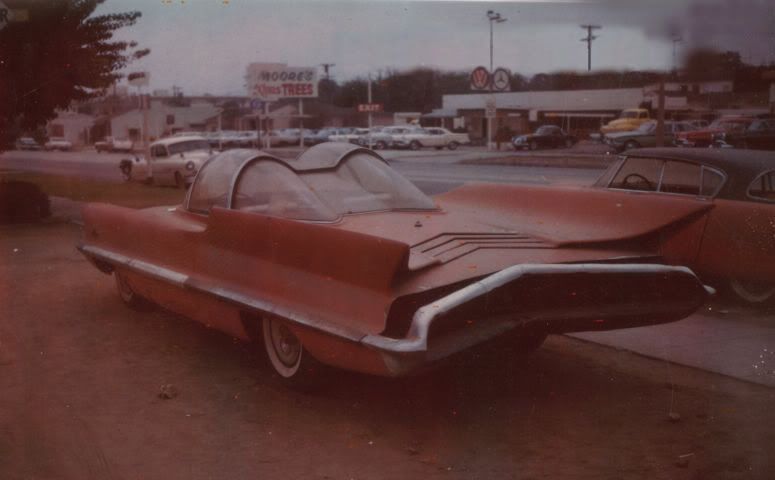 But the Futura already featured many of the details that the Batmobile would later become famous for. This was a good thing too since the studio only gave Barris 3 weeks to deliver a finished Batmobile in time to shoot the first film tests. Barris and his team made several major design changes to the car that brought it squarely into the "muscle car" era of the 1960’s. Being the shrewd businessman that he was, George wasted no time in securing a patent for his creation. 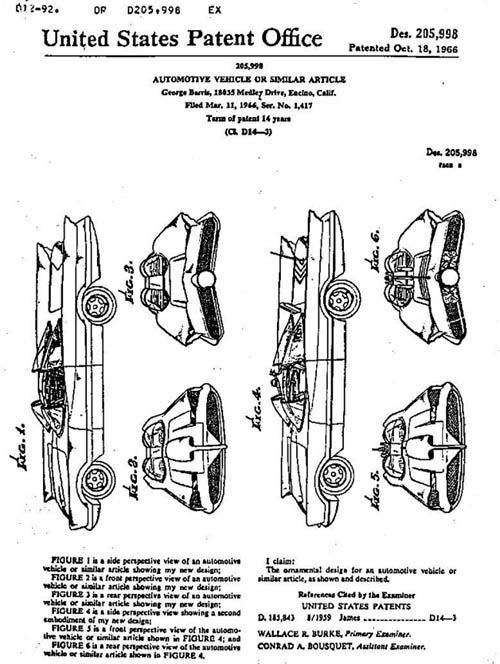 True to his word, Barris delivered the finished Batmobile on time, and the studio was thrilled with the result. When the Batman TV show premiered in 1966, the Batmobile became just as much of an overnight star as Adam West and Burt Ward. Children around the WORLD thrilled to the Dynamic Duo racing into action in their awesome black hot rod!! 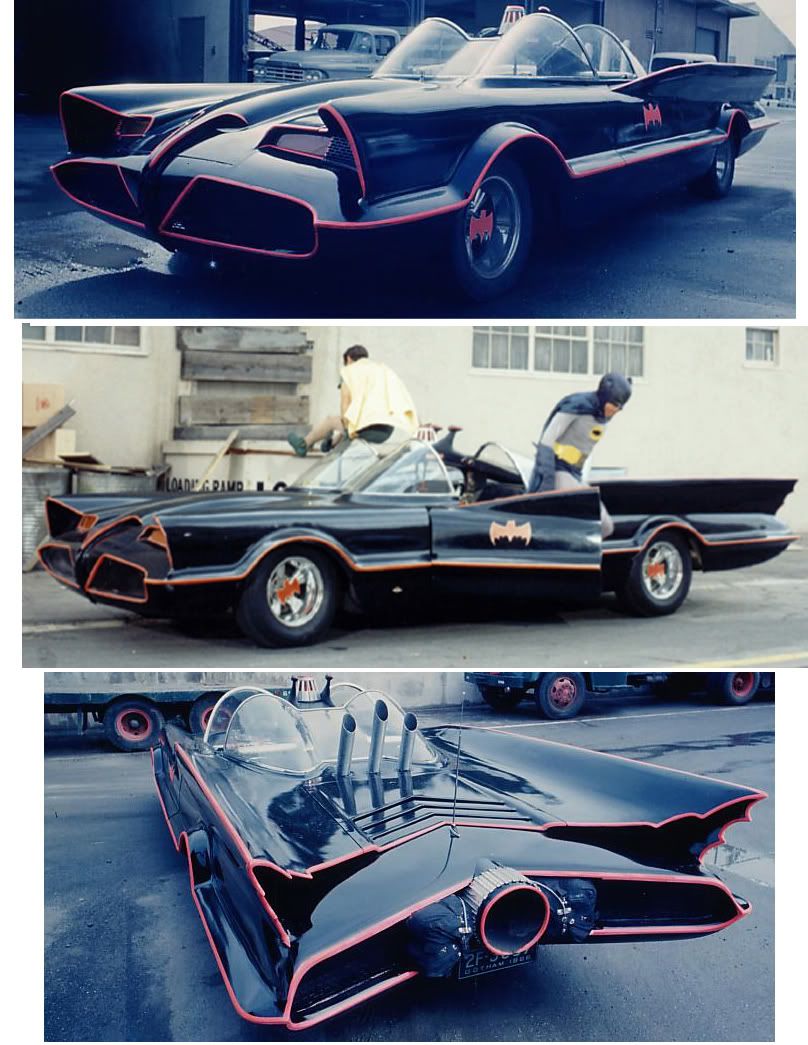 |
|
|
|
Post by darklord1967 on Aug 6, 2008 10:37:30 GMT -5
I decided that my best plan for creating an accurately MEGO-scaled and detailed Batmobile toy was to find a Lincoln Futura toy replica (hopefully in the right size), and customize it into the Caped Crusader’s ride. Unfortunately, an extensive search in the world of toy cars turned up nothing. No appropriately-sized Lincoln Futura toys. Darn! However, I did find the 1995 re-issue of the 1/25th scale Revel Monogram Lincoln Futura model kit (originally produced in 1956). 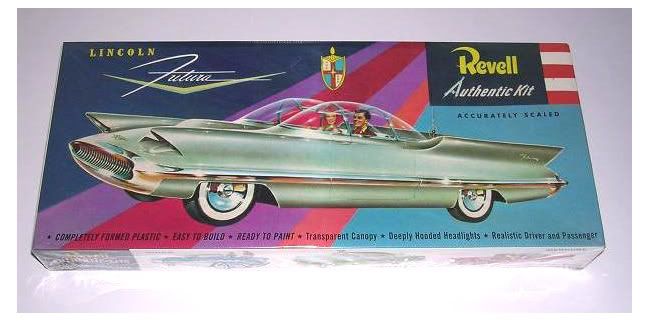 This was a beautiful kit with extremely accurate sculpting. The body was nice and, long and sleek, and the fine detail was superb.  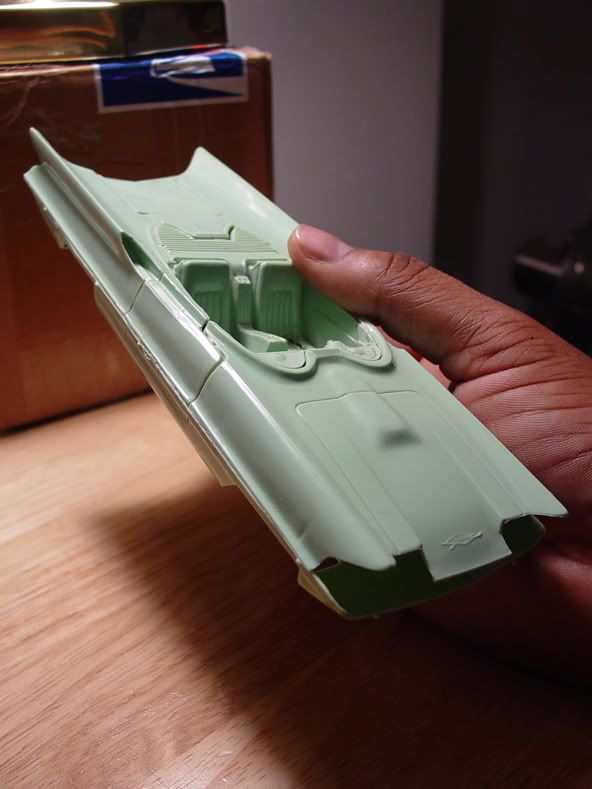 Now this model would have been the PERFECT starting point for a very accurate MEGO-scaled Batmobile… if it had been in the correct size. As part of my research, I learned that the actual Lincoln Futura showcar was 227 inches in length. At 1/25th scale, this model kit was just a hair over 9 inches in length. Not exactly appropriate for an 8 inch MEGO Batman to drive around in! 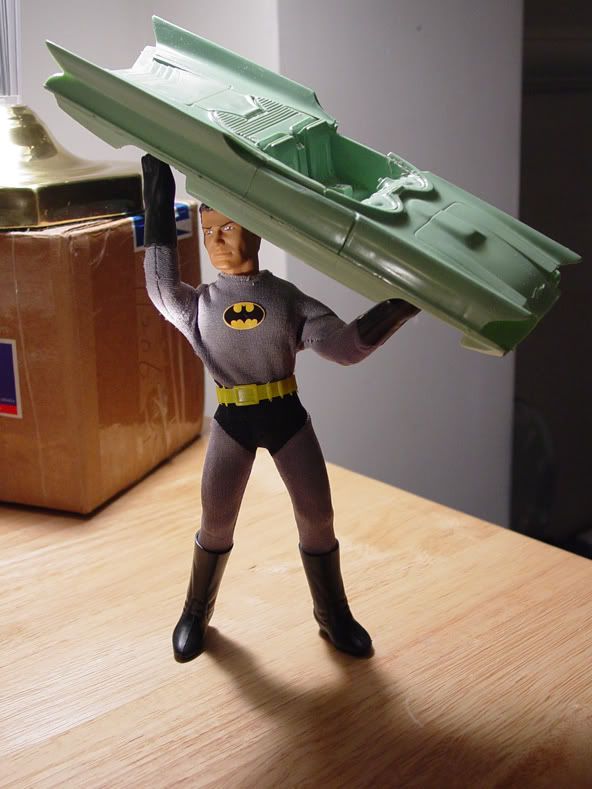 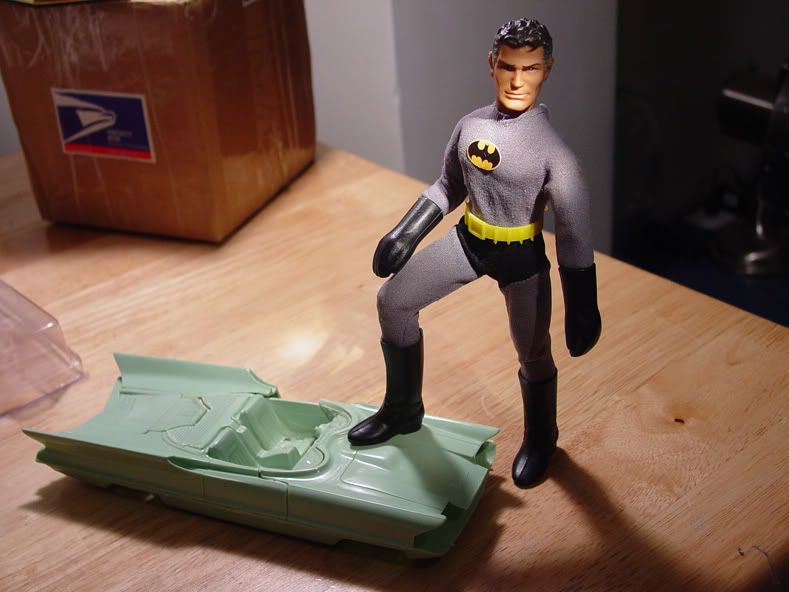 Now, the scale-conversion math on this project was pretty straight forward: 8 inch MEGO (heroic male) figures exist in a 1:9.5 scale. When calculated out, it works like this: 8 inches X 9.5 scale conversion = 76 inches of real-life height. So an 8 inch heroic MEGO male equals a 76 inch (6 ft. 4 inch) tall man. It works out perfectly. Superman’s height is officially identified as 6’4”. And although Bruce Wayne’s height is officially listed as 6’2”, allowances can be made for an additional two inches in The Batman’s height due to his thick (combat) boot soles and his cowl. It should also be pointed out that nude MEGO type II bodies measure in at exactly 7.75 inches. Converted at 1:9.5 scale, that translates to a real life man between 6’1” and 6’ 2” in height. This 1 : 9.5 scale, then, must also be employed to determine the correct size of the custom Batmobile toy. So working backward: 227 inches in length (of the actual real-life car) divided by 9.5 (MEGO scale) equals a toy car that is 23.89 inches in length. That’s virtually TWICE as long as MEGO’s 1974 Batmobile toy! Alright. Enough research! Enough calculations! Time to get to work building this big toy! |
|
|
|
Post by darklord1967 on Aug 6, 2008 10:38:48 GMT -5
I spent the next couple of weeks converting the small Revel Monogram Lincoln Futura model kit into the ’66 Batmobile I was so familiar with. Admittedly, this was not as easy to do as I had hoped, but it wasn’t impossible either. Just as George Barris had done on the actual Lincoln Futura, I radiused the wheel wells and used a Dremel to open them up. 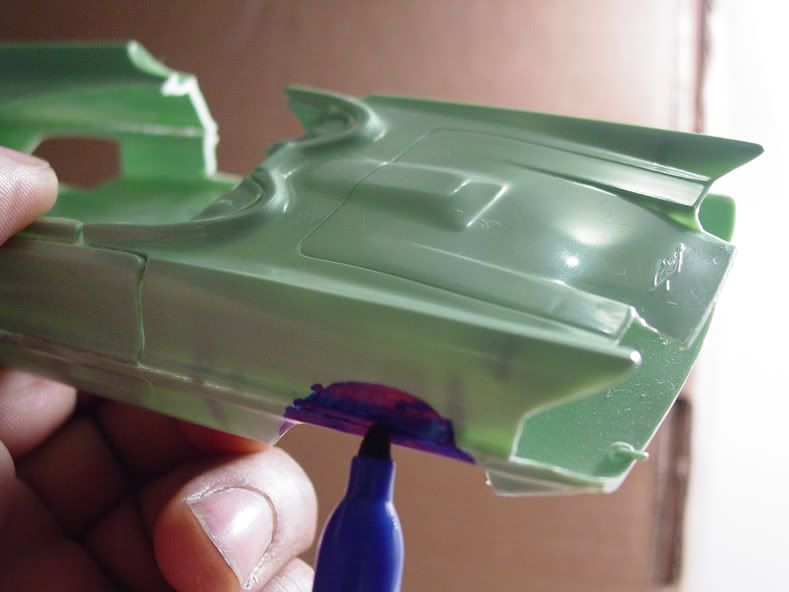 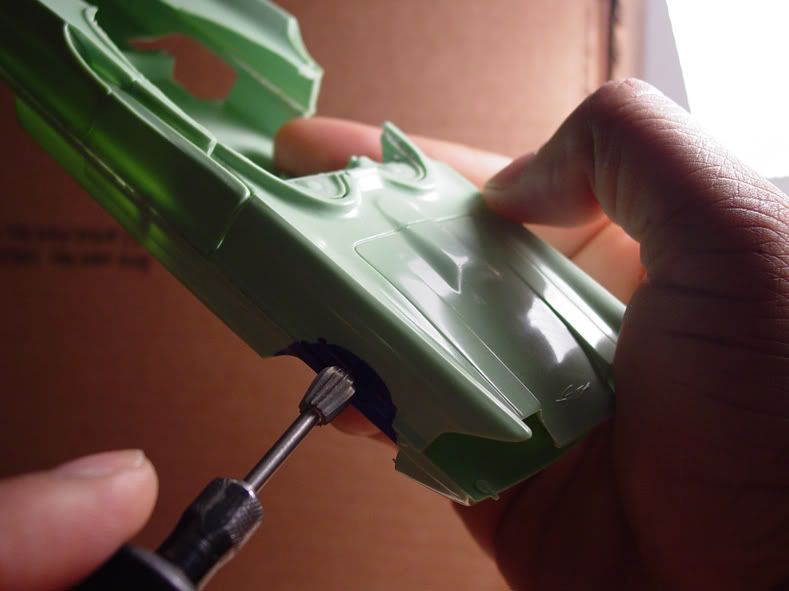 I also wanted my final MEGO-Scaled Batmobile Toy to have separate seats in the cockpit. Since this model kit came with a full cockpit tub with seats that were molded in place, it became necessary to carefully cut them out. 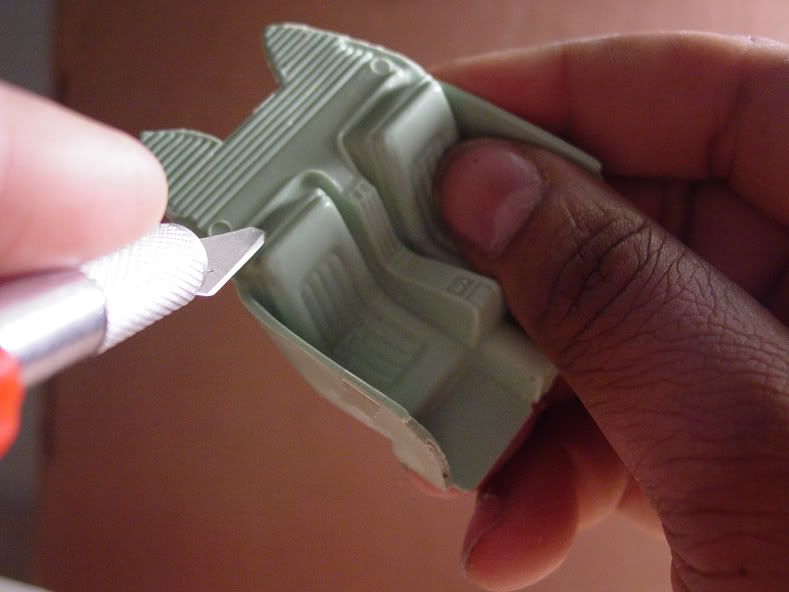 With the seats cut out, I fabricated a new backing wall for the interior tub with white sheet styrene. 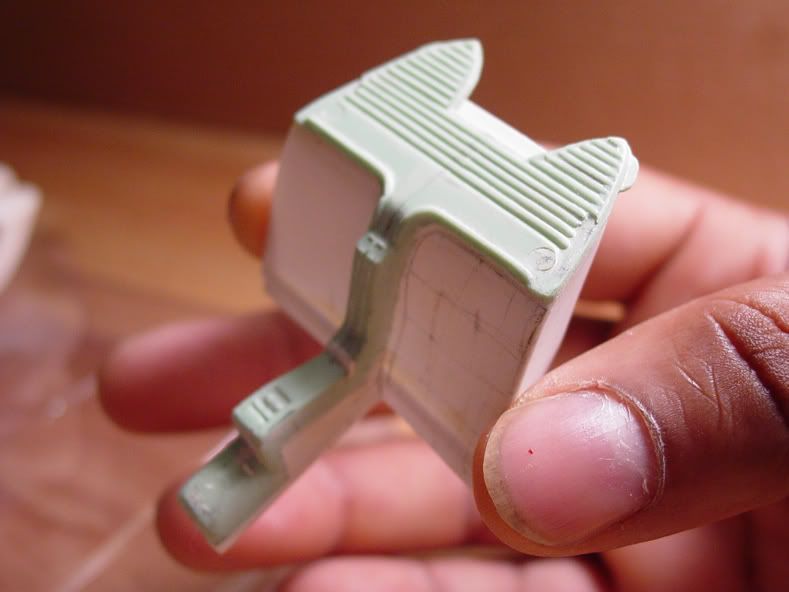 With some careful sheet styrene work and squadron putty I converted the Lincoln Futura model into the Batmobile’s basic profile with the flared fenders and wheel openings. I scalloped the tail fins, and extended them into the doors. 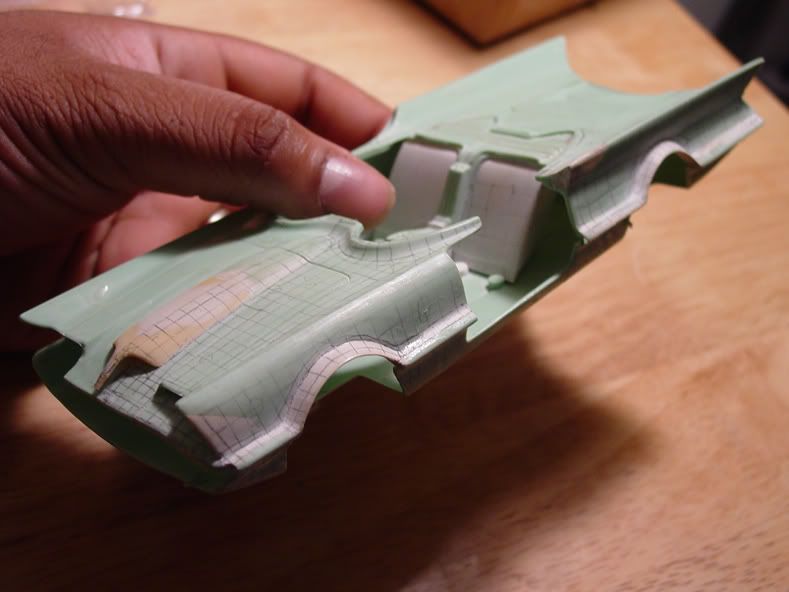 With the Bat-customization of the model kit completed, the next order of business became figuring out a way to convert the small 9 inch model into a correctly-sized 24 inch long car for my 8 inch scaled MEGO Batman and Robin. Easier said than done… especially back in 2001… |
|
|
|
Post by darklord1967 on Aug 6, 2008 10:40:18 GMT -5
I knew that creating re-sized toys off of smaller or larger prototypes was pretty common in the world of toy manufacturing. I had heard of pantographing, the process by where a mechanical senor arm ran along the full surface of a prototype model reading every detail, while a linked sculpting arm sculpted a copy of those details in a new size in hard clay. I had also learned about stereolithography. This was the system that consisted of an Ultra-Violet Laser, and a vat of photo-curable liquid resin. A platform was lowered into the resin (via an elevator system), such that the surface of the platform was a layer-thickness below the surface of the resin. The laser beam then traced the boundaries and filled in a two-dimensional cross section of the model, solidifying the resin wherever it touched. Once a layer was completed, the platform descended a layer thickness, resin flowed over the first layer, and the next layer was built. This process continued until the model was completed. The model is then removed from the platform, washed of excess resin, and then placed in a UV oven for a final curing. The trouble was, both of these procedures were incredibly cost-prohibitive for a simple MEGO toy customizer from Brooklyn. We’re talking upwards of $15,000 - $35,000, (depending on which procedure was employed and what size the final prototype was intended to be). At those prices, things certainly did NOT look good for the future of my customized MEGO Batmobile. But then, as luck would have it, I came across an experimental new prototyping process that was used by a rapid prototyping company in Salt Lake City, UT. This process promised to be far more affordable and gave my Batmobile project all new life! 3-D Printing: was a relatively new concept in 3-D prototyping. The concept behind it was that a model would be fully laser-scanned and re-created as a 3-D CAD file on computer. That file could then be used to run a revolutionary new printer that would actually create prototype white polyurethane parts by making them entirely out of flat cross-sections BONDED together. Think of it as creating an entire salami out of hundreds of individual slices. The process was expensive, but far more affordable than the other two commonly used prototyping procedures. The reason for this was because the finished 3-D printed parts ended up with a rough texture that required hand finishing / smoothing. The good news was that these polyurethane parts were fully sandable and could be made glass-smooth with a reasonable amount of effort. Back in business, baby! Back in BUSINESS!! I sent my bat-converted Lincoln Futura model kit to Salt Lake City to be 3D scanned. And waited anxiously for the scaled-up parts to be created, packaged and shipped to me. That was probably LONGEST 4 months of my life. My MEGO helper / assistant and I passed the time gathering up parts that we intended to use for the Batmobile’s construction. Here he is on the day some temporary wheels and rubber racing tires arrived for the car. 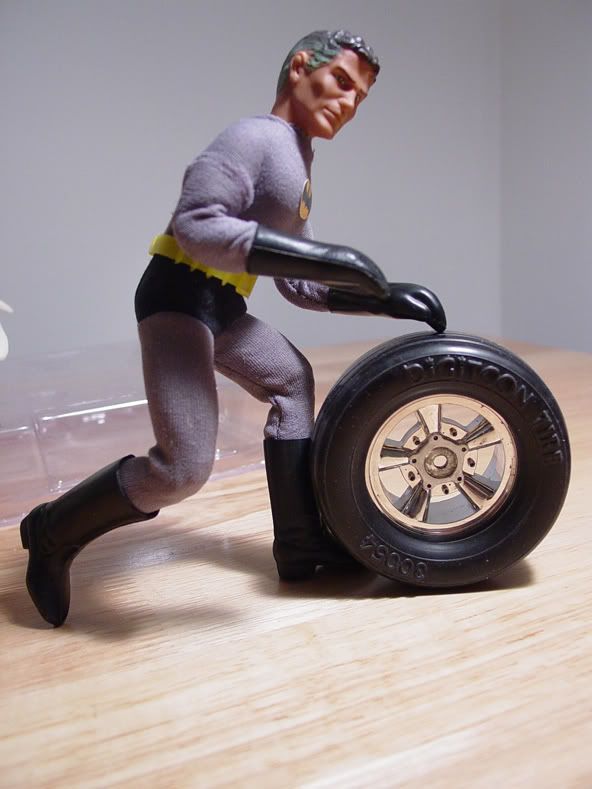 Finally, the package arrived, and when I saw the newly-sized Batmobile parts, I was thrilled beyond words! 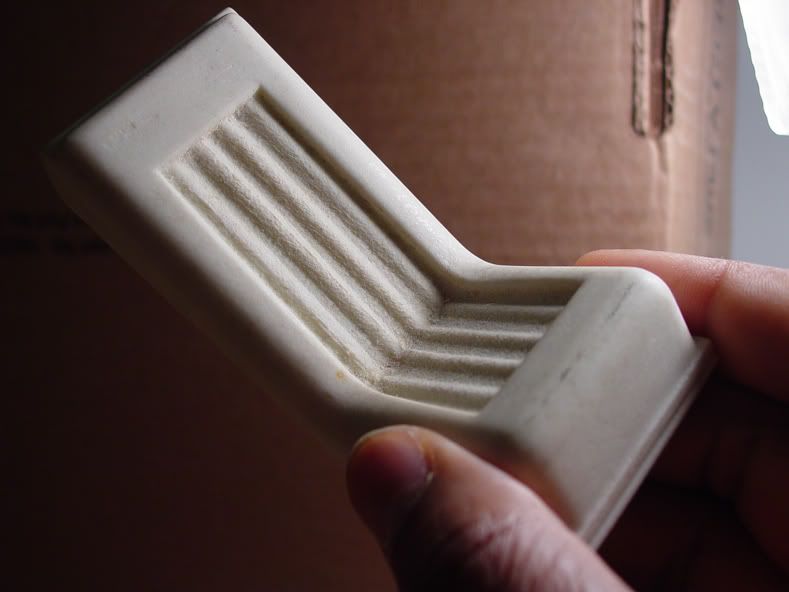 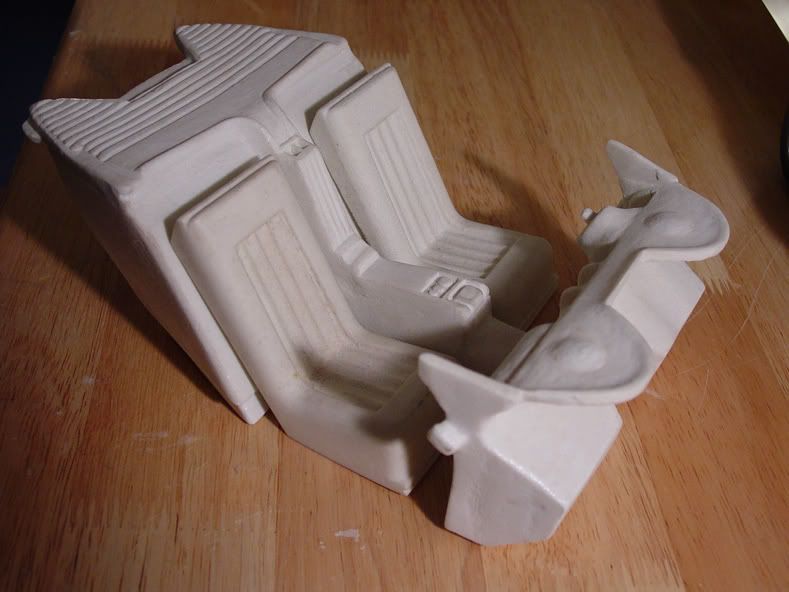 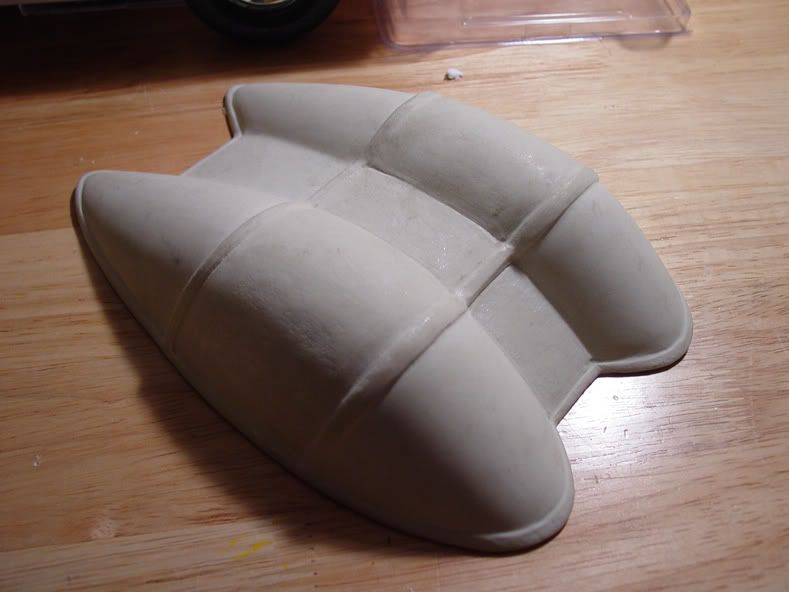 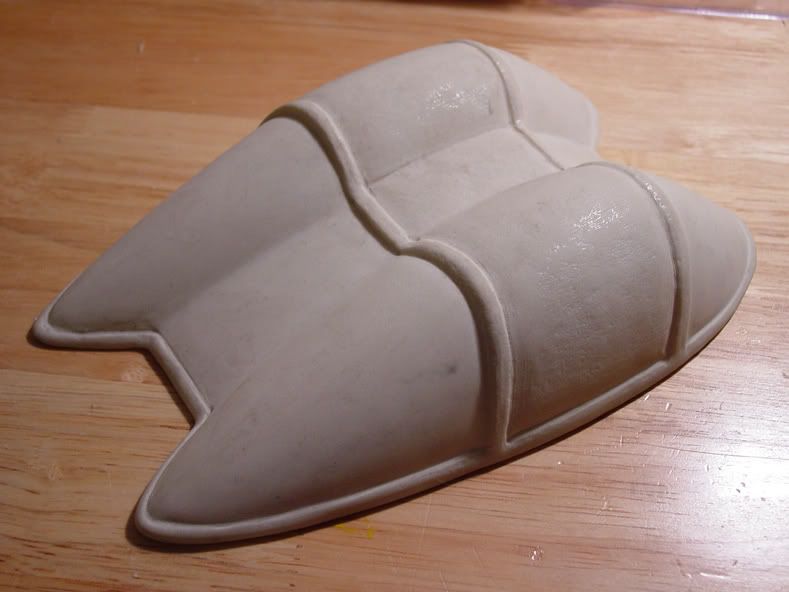 When assembled together, the scaled-up Batmobile parts became a beautiful prototype of the Batman’s ride in perfect MEGO scale… FINALLY!!!!!! 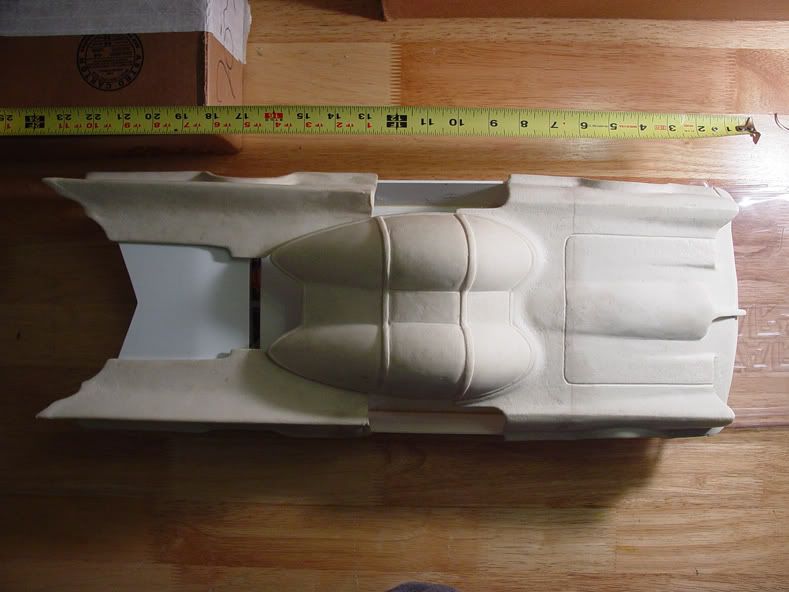 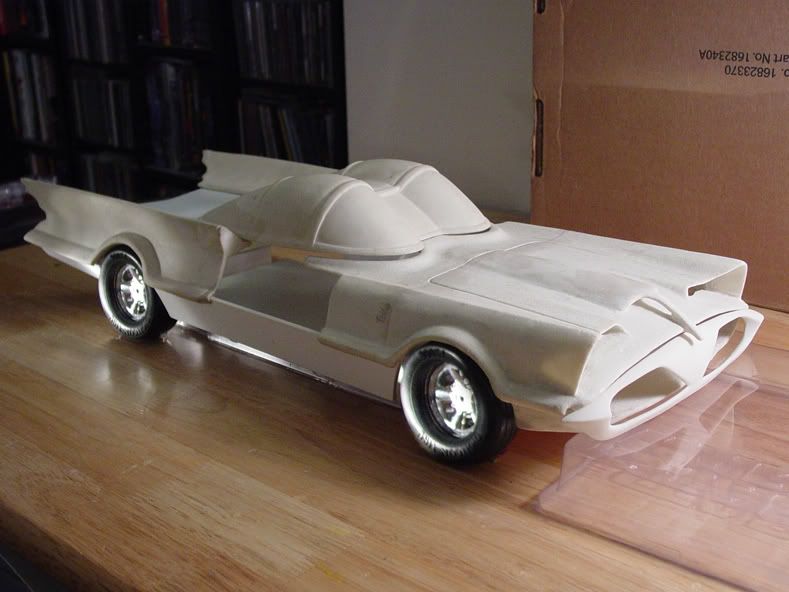 My MEGO assistant and I wasted no time! He immediately began to pose in and around the car to double check the scale accuracy (he’s such a ham). But my inner geek nearly cried from joy! This was going to be an incredible custom toy!! 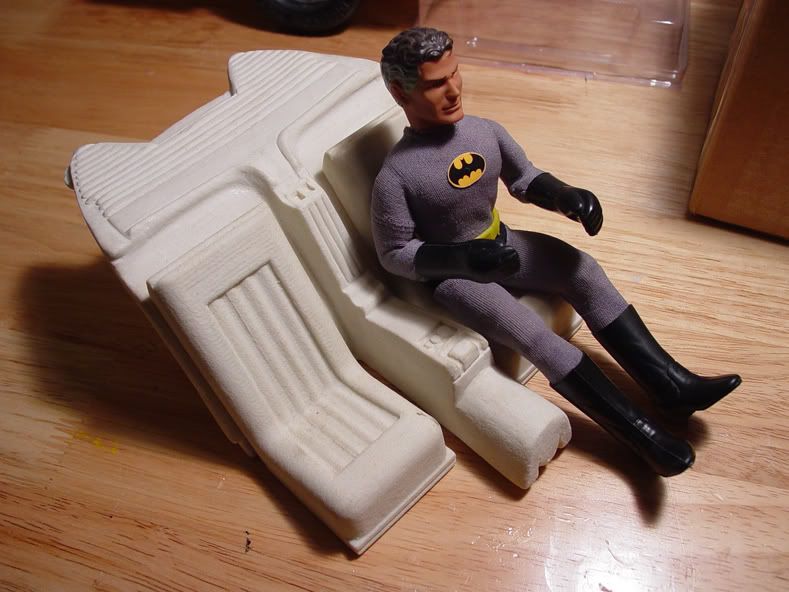 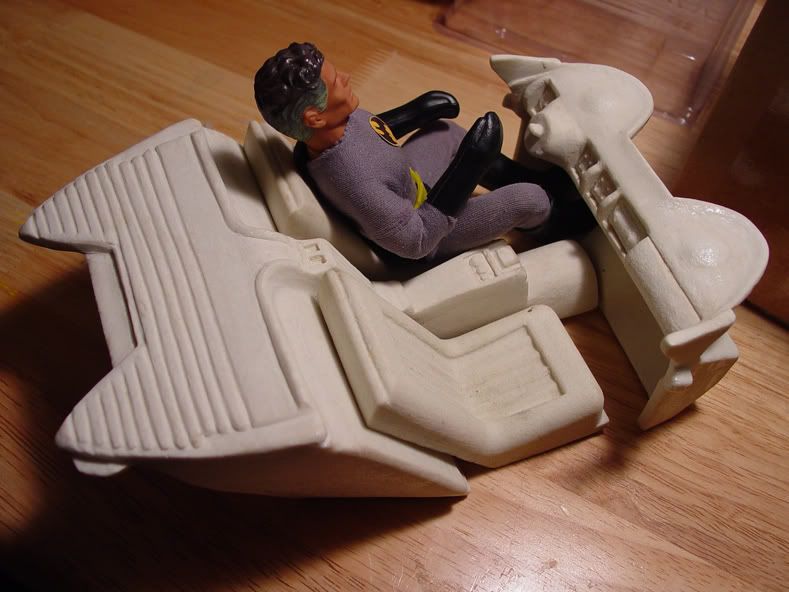 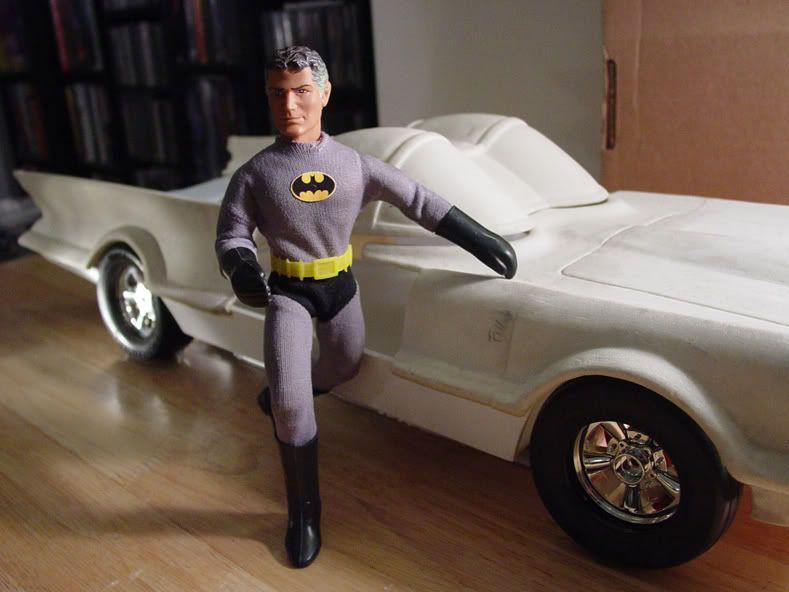 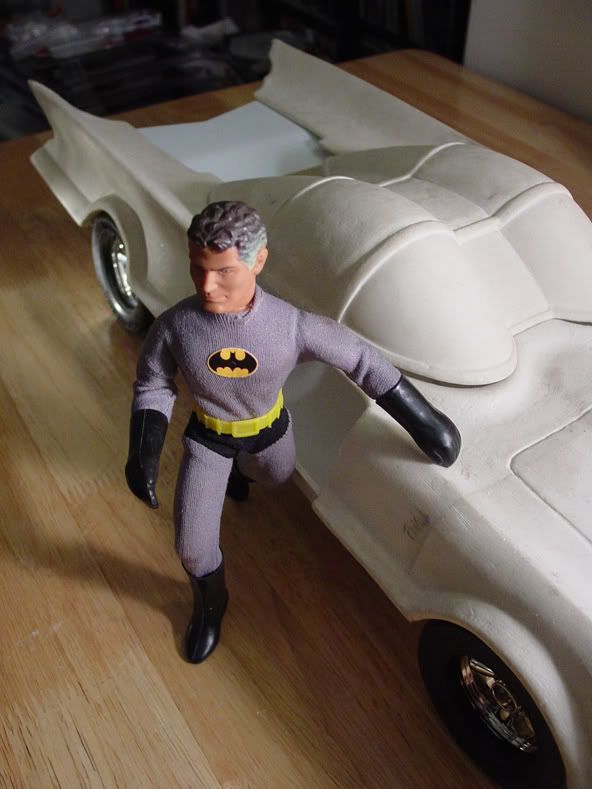 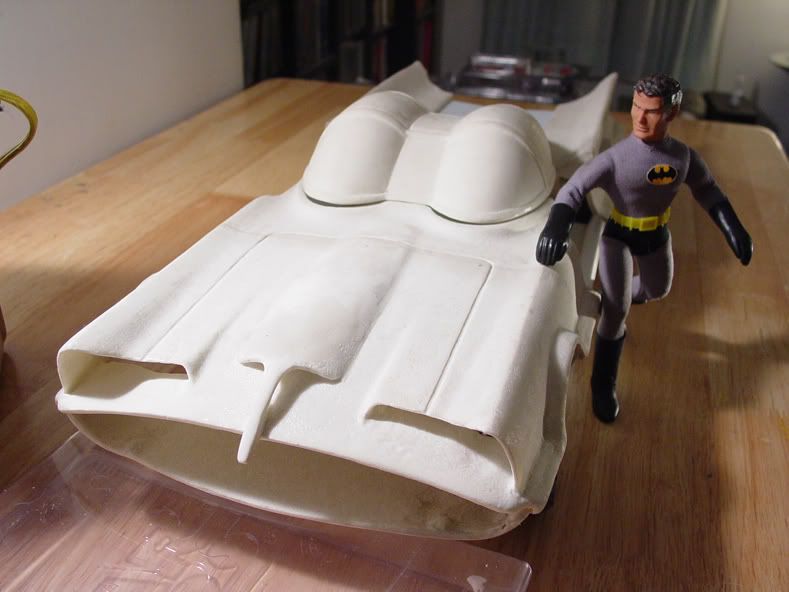 As expected, the parts needed some smoothing and finish-sanding, but it would be far less than I expected. And some of the car’s simpler flat shapes could very easily be reproduced in sheet styrene (such as I have begun to do with the lower rocker panels of the body)  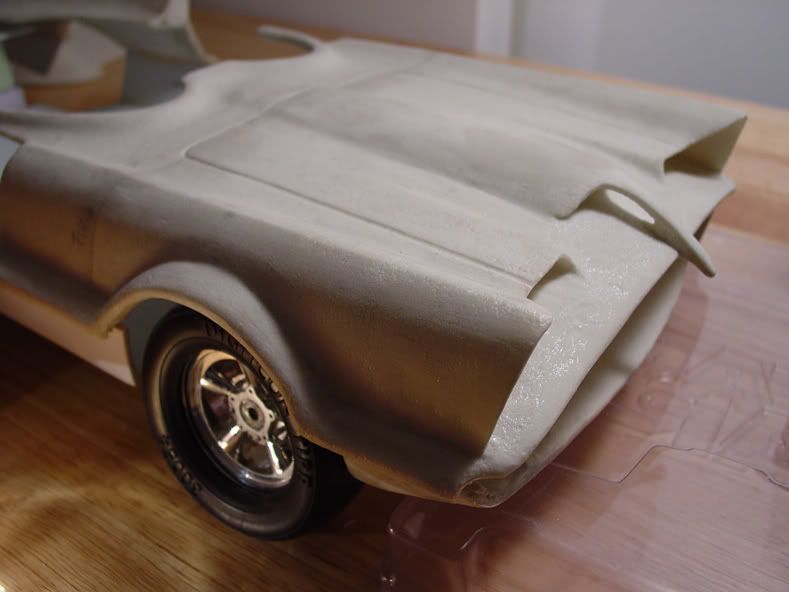 The size comparison of this rough prototype next to MEGO’s 1974 Batmobile was more startling than even I expected. 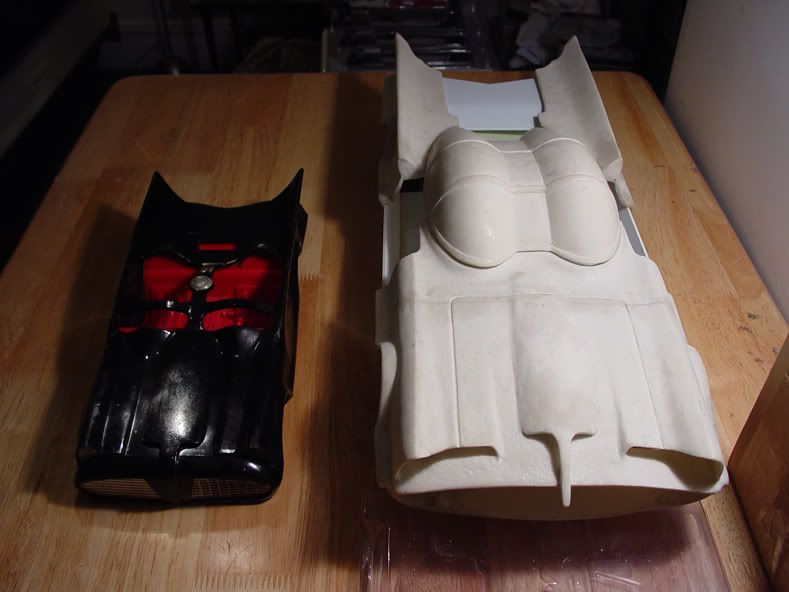 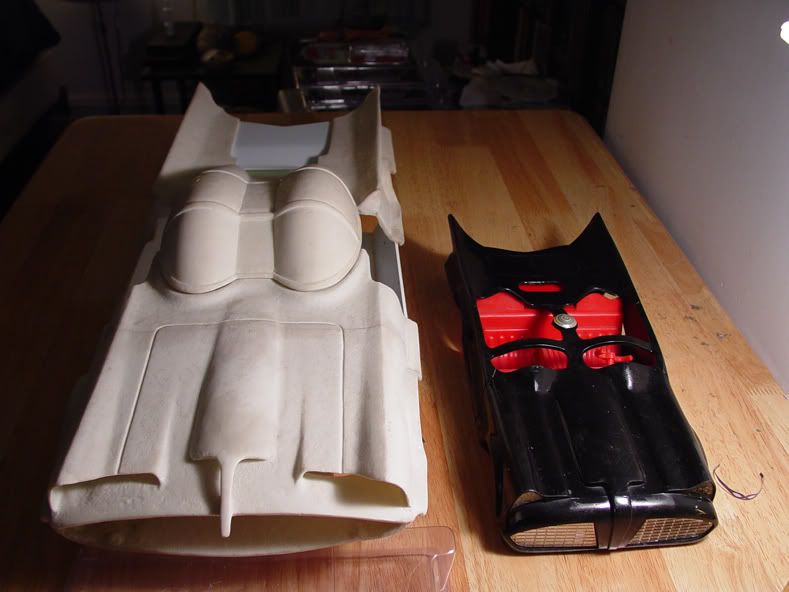 Now that I had the scaled-up parts, the next order of business was to come up with a construction PLAN. Organization is everything in a project of this magnitude. Since I planned for this toy to feature working lights, I realized that I would need to build this car from the inside – out so that I could effectively conceal all the electronic wiring. First I would build the fully-detailed cockpit tub (featuring velvet “carpeted” floor, plush seats, Bat-phone and electronic dashboard). Next I would tackle the chassis / drivetrain / steering assembly (most likely kit-bashed and adapted from an RC car). Then lastly, I would assemble, detail and paint the main car body with working doors. Will Roberto succeed in his Batmobile construction plans? Will he make it all the way through without breaking the bank? Will Roberto's custom MEGO Batman and Robin cruise in ultimate sytle? Tune in next time! Same Bat-Time, Same Bat Channel ! |
|
|
|
Post by jlavaia on Aug 6, 2008 12:30:19 GMT -5
you do great work. nice job. that Wayne Manor is going to be ridiculous and i cant wait it when you get it finished. the Batmobile looks real good and i'm looking forward to seeing it painted. thanks for the great pics and the story on how you're putting everything together.
|
|


